 Fall Maintenance Must-Dos Cooler temps on the horizon, so it's time to make sure your home is prepared. Consider these tasks, and start checking them off! Get Your Gutters Ready Make sure your home is ready to deal with the rain and snow that comes as the seasons change. Walk around your home and check for loose gutters, broken pieces and detached downspouts and make the necessary repairs. Ensure your gutters are clear of leaves and other debris and that your downspouts are directing water away from your foundation. Check Exterior Caulking and Weatherstripping Fall is the perfect time to make sure your house is properly caulked and your weatherstripping is in good shape. Inspect around windows, doors and anywhere else two materials meet to make sure the caulk is in good shape. Check weatherstripping around doors and replace if it's broken or missing – it's super easy to do. Give Your Roof a Once-Over No one wants to be fixing a roof in the dead of winter. Give it a once-over to make sure there aren't any signs of trouble. Pay attention to broken or missing shingles, missing flashing and any discoloration. Fix Driveway and Sidewalks Before They Get Worse Changing temperatures and moisture can turn a small concrete problem into a big one. Take some time to repair broken concrete and get some more time out of your sidewalk, driveway and steps before they're in need of full replacement. Winterize Your Gas Grill If you're not a winter griller, now's the time to pack away your grill before it's covered with a foot of snow. In addition to giving your grill a thorough cleaning to remove grease and food scraps, take these steps to help prevent any unpleasant surprises when you fire up your grill again next spring. Shut off the gas at the LP tank, unfasten the burner, slip the gas tubes off the gas lines and lift out the unit. Coat the burners and other metal parts with cooking oil to repel moisture that can build up over the winter and to prevent rust. Then wrap the burner unit in a plastic bag to keep spiders and insects from nesting in the gas tubes during the winter. This is a common problem that can make for balky starts, uneven flames or even a one-alarm fire the next time you light your grill. If you're storing your grill outside during the winter, just keep the propane tank connected (but shut off) and put a protective cover over the entire grill when you're done cleaning it. If you're storing the grill indoors, don't bring the tank inside, even into the garage or a storage shed. A small gas leak can cause a huge explosion if the tank is stored in an enclosed space. Instead, disconnect the tank and store it outside in an upright position away from dryer and furnace vents and children's play areas. Tape a plastic bag over the grill's gas line opening to prevent insects from nesting. Winterize Your Sprinkler System You don't have to pay someone to blow out your sprinkler system. You can do it with your own compressor, but be aware that even the largest home compressor isn't powerful enough to blow out the entire system at once. If you like number crunching and you have the original irrigation layout showing the gallons per minute (gpm) of each sprinkler head, divide the gpm of each zone by 7.5. That'll give you the cubic feet per minute (cfm) you need to blow it out. Otherwise, rent a 10-cfm compressor and hose from a tool rental center. Set the compressor air pressure regulator to a maximum of 80 psi for rigid PVC pipe systems, or 50 psi for flexible black polyethylene pipe. Then turn off the water supply and set the system timer to open just one zone. Next, open the manual drain valve at the end of that zone (if equipped). Then, connect the air line to the blow-out port, as shown. Close off both valves on the backflow preventer. Then remove the plug on the blow-out port and screw in a quick-connect hose adapter. Snap on the air hose and connect the other end to the compressor. Now blow out the line. The heads should pop up and spit out water. Disconnect the hose as soon as they run dry. Don't overdo the blow-out—without water cooling the plastic gears, they can melt in less than a minute. Move on to the next zone and allow the heads to cool. Then go back and blow out each zone a second time. Change Your Furnace Filter Changing your furnace filter is one of the easiest things you can do to keep your furnace in good shape. If you haven't changed it in a while, make sure you have a fresh one before your turn your furnace on for the first time. Annual Tune Up And Maintenance For Your FurnaceMake sure your furnace is in good shape before you really need to use it. With a few tools and some time, you can perform a DIY furnace inspection to head off problems before they start. Check Your Water Heater Extend the life of your water heater tank and maintain your water heater's efficiency and safety with a few minutes of basic maintenance once a year. Learn how to clean sediment from your water heater here. Winterize Your Lawn Mower Don't just shut off your lawnmower and leave it until spring – that's a bad idea. But winterizing your mower only takes an hour. Give the deck a thorough cleaning. Then, add fuel stabilizer and a few ounces of oil to make sure the engine will start right up without hesitation in the spring. Store Outdoor FurnitureDon’t leave your outdoor furniture exposed to the elements all winter long. At the very least, give your furniture a thorough cleaning and cover it or bring it inside for the season. Stockpile Firewood Whether you have a source of wood on your property or need to purchase a cord or two, fall is a great time to spend cutting and chopping wood to burn in your fireplace all winter long. And if you're using a chain saw, make sure to brush up on your safety knowledge before you hit the forest. Cut Your Lawn Short Keep mowing your grass until it stops growing. And your last mow of the season should cut your grass nice and short. This reduces the chance that your lawn will get snow mold and vole damage. Fertilize Your Lawn It's important to apply fertilizer to your lawn during the fall – in fact, if you only apply fertilizer once a year, fall is the time to do it. Your lawn has spent all summer growing and it's hungry. Bring Paint InsideFreezing can ruin latex paint and other finishes, so make sure to move your paint inside before the first frost. Some latex paint can survive a couple freeze/thaw cycles, but it's better not to chance it. Inspect and Fix Your Garage Door Cold can wreak havoc on garage door tracks. Make sure your garage door is in good shape so you don't find yourself stuck in the garage (or worse yet – stuck outside). Learn all you need to know about fixing your garage door here. Check Your Detectors With furnaces turned on, the windows closed and portable heaters humming along, fall is a great time to make sure your smoke and CO detectors are working. Check batteries and expiration dates – smoke detectors are typically good for 10 years, and CO detectors last for about six years. Clean Dryers and Vents Thousands of dryer fires are caused by lint every year, yet they can be easily prevented with a few minutes of cleaning. With drier air and cooler temperatures approaching, make it a fall ritual to clean out your dryer and vent. Closing Summary There are so many more things you can do to get your home ready for the winter.....our best advice is to use some common sense. Ask yourself these two questions; "Can water, or the cold weather ruin it and how much will it cost me? If you answer "Yes" to any of these two questions, make sure that you take care of it before its too late! 
1 Comment
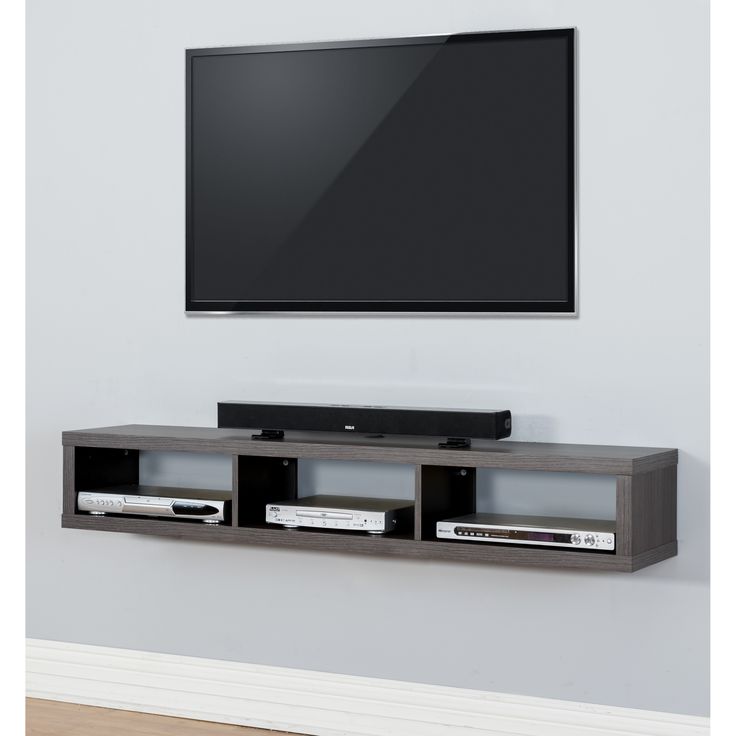 Nothing looks better than a wall mounted TV that is clean, without clutter or wires showing! We'll show you how quickly and relatively inexpensive it is to install a wall mounted TV without all of the clutter. Mounting your TV to the wall is not only a great way to save space, but it also looks nice and clean. However, there’s a little more to it than just buying a wall mount and screwing in your TV. Here are a handful of things you should know when it comes to mounting your TV to the wall. Decide Where to Mount Your TV First off, you need to figure out exactly where you want your TV to go. This is something that is ultimately up to you, but there are a couple of rules of thumb to be aware of. The most important rule is to mount your TV at eye level from where you’ll be watching it, if at all possible. This usually means the bottom of the TV will be somewhere around 2-3 feet off the ground, give or take a few inches. Many people mount their TV up high above a fireplace or bookshelf, but that’s usually a bad idea since you crane your neck up to see your TV, which can be very uncomfortable when done for an extended period of time. The only exception is in the bedroom, where you might want to lie down and watch TV at the same time—having the TV mounted up higher toward the ceiling is great for this, as you would have to tilt your head forward as severely. We've researched the web and we were able to find all of the mounts, brackets and wiring set up that you'll need from Amazon......they're cheap and if you have a Prime Membership, it will be at your front door in days. Mounting Systems Get the Right Mount Type and Size, there are generally two types of wall mounts that you’ll come across. The first one is an articulating mount, which comes with a couple of articulating joints that allow you to pull the TV out from the wall and turn it in nearly any direction. The second type of TV wall mount is also the most common, called a tilting mount. These allow you to mount your TV to the wall at multiple points—sometimes up to six—so they’re great for larger, heavier televisions. The only downside is that you can’t swivel the TV side-to-side—you can only tilt it up or down, and even then you can only tilt it a few degrees. But if you’re going to be mounting it at eye level right in front of the couch, you really don’t need any major articulation features anyway. Once you decide on the type of mount you want, you also need to make sure that it will fit your television’s mounting holes. All modern televisions are VESA mount-compatible, which simply means that they comply with the Video Electronics Standards Association’s mounting standard used by pretty much every TV mount on the market. However, televisions have different mounting holes, so it’s important to get the right size mount that will fit your specific TV. Luckily, thanks to the VESA standard, it’s really easy to figure out what mount size you need. If you look on the back of your television, there will be four screw holes that form a square. Simply measure the distance between two of those screw holes (not diagonally) in millimeters. So if the distance is 400 millimeters, you would need a VESA 400 mount (or sometimes called VESA 400×400). Luckily, most tilting mounts are compatible with pretty much any VESA mount size, but it’s always a good idea to check before you buy one. Selecting the best and right location to mount your TV. Now that you have the TV wall mount, its important that you pick the proper location because you just can’t pick a random spot and start screwing it in. Televisions and the mounts themselves are heavy, so you need to make sure that you mount your TV correctly so that it doesn’t come crashing down after you install it. Checkout the following site to know what tools you'll need to do this job right: The Basic Tools Every DIYer Should Own You’ll need to screw the TV mount into wall studs for maximum holding power—if you just mount it to the drywall, you’re sure to cause a lot of damage, since drywall isn’t actually that strong. Get a stud finder and use it to locate the studs behind the drywall. Studs are placed every 16 inches on center, so you should be able to mount your TV on two studs if you’re using a tilting mount, sometimes three studs if you have a larger television and mount. From there, place the TV mount where you want it (have a second person there to help) and mark with a pencil where you need to screw it into the wall, making sure that there are studs at these locations. Before you screw in the TV mount, though, you’ll need to drill pilot holes, which will prevent the studs from splitting when you drive in the screws. Plus, if the mount uses thicker screws or bolts, it’ll be pretty much impossible to drive them in without drilling pilot holes anyway. Remember that the drill bit for the pilot hole will need to be just slightly smaller than the width of the screw. Once you have your pilot holes drilled, you can now position the TV mount on the wall and drive in the screws or bolts using a power drill or socket wrench (depending on the type of screws or bolts used). There will likely be instructions included with your TV mount, so be sure to take a close look at those if you’re unsure of anything. After you’ve placed the mount on the wall, it’s just a matter of attaching the brackets to your TV using the four screw holes on the back of the television, and then hooking that up to the wall mount. 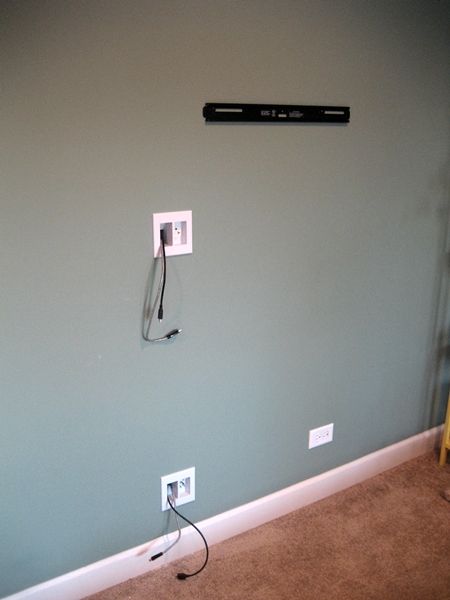 Hiding those pesky wires. The best option is to install a organizer kit that more or less creates an extension cord behind the wall using code-compliant electrical wire, as well as a dedicated tube to feed other cables through. This will allow you to plug the TV in right where the mount is, and the rest of the cables get routed down near the baseboard where you can then plug the cables into their respective devices. (You could just drill two holes in the wall and run the cables through them, but that’s against code.) However, installing something like this requires cutting a hole in your wall and a bit of electrical know-how, so if you’re not quite sure what to do, feel free to call a local handyman or electrician to do it for you, or get a knowledgable friend who can help out. If you’d rather not make giant holes in your wall either way, then the easiest method is to buy a cord hiding kit that you simply screw to the wall and route all of the cables through that. It won’t make the cables completely hidden, but it will look a lot cleaner than just leaving the cables dangling. In the end, mounting a TV to the wall isn’t too difficult, and I highly recommend it if it’s possible to do in your home. You'll be happy you took the time to do it and your family and guests will like the clean look.  Most DIY people that we work with sometimes run into projects that are above their knowledge, experience or the project is just plain too complex for them to tackle. They have to bring in the big guns....the pro's! The most valuable source of good contractors are you family and friends who have had work done on their home. They'll give you an unbiased opinion and what you can expect to pay. You'll have to verify their credentials (contractors license), workman's compensation and liability insurance requirements. You can do all of this by visiting your state licensing board or a national registry that will redirect your inquiry to your particular state. You should also interview and get bids from at least 3 separate contractors so that you'll be able to get the best price with a schedule that you'll be comfortable with.
There are also national services that prescreen contractors by location and trade. The names may sound familiar to you; Angie's List, HomeAdvisor, and Local Handyman Pro's, just to name a few. These are trusted names that provide a good source of qualified contractors that work in your area. These are the type of projects that may present a challenge to all DIY'ers due to the size of the work and what impact it would make if you made a mistake.
This is the most important advise we can give if you do go ahead a hire a professional. Make sure that your contractor plans to stay and finish your project until its completed. Less reputable contractors may take your downpayment and then disappear for a few days to start or work on other projects. You can insure that your contractor will stay the course if you set up payment draws based on the work that they've completed. Our friends at "Building Advisors" has set up and good example of how you can pay your contractor based on the work that they have achieved. Check it out "HERE". |
AuthorsWe're local handy guys and girls who love to build things, rebuild things and create things! ArchivesCategories |
 RSS Feed
