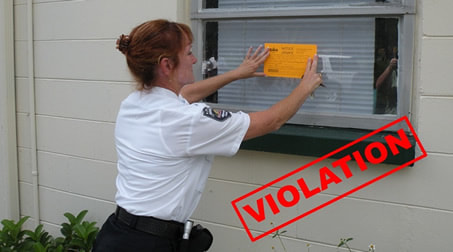
 Anytime you undergo an inspection there’s the chance of being given a notice of violation of a specific building code. Left unfixed, this notice can turn into anything from a hefty fine to closure of the structure. Because of the negative effects from building code violations, you should address the issues in question as soon as possible. Fixing building code violations is a simple process, though, requiring little more than contacting the right repair people and finishing the repair process in time for the follow-up inspection. Approaching the problem in a timely and efficient manner is the key, but done correctly should have you up to code with time to spare.
1) Make a checklist of all of your building code violations grouped into categories based on contractor type. This ensures quick completion of the repairs that won’t have your contractors getting in one another’s way. 2) Download the building codes for your area from an online site like Municode. Reference the codes to determine the extent of repair necessary to fix each individual violation. 3) Contact a building code consultant in your area if you are unsure about how to bring a particular violation up to code. 4) Obtain a work permit, if necessary for construction, to proceed with the building repairs. 5) Contact and hire licensed contractors to handle the repair work for your building. Ask around among other building owners in the area for contractors with a reputation for good work that’s completed within the estimated project times. 6) Repair structural violations first. Handle major repairs that involve going into the interior of the walls, such as wiring, plumbing or anything else of this nature, before any other repairs. This will make sure you won’t have to undo any superficial repairs later to gain access to the structure of the building. 7) Repair any fire safety code violations next. Make sure that your building meets all codes for fire safety in your locale, installing sprinkler systems, alarms or fire extinguishers as needed. 8) Make any accessibility changes necessary. This includes any ramps or handrails. Hire a licensed architect to make any changes in the building required for accessibility options such as widening doors for wheelchair access. 9) Put up any signs required by local building codes such as maximum occupancy rates or exit signs. Make any other minor superficial repairs required as well.
0 Comments
 Years ago, homeowners didn’t give much thought to their thermostat — it was a piece of equipment with simple functions: turn the heat or air conditioning on or off, adjust the temperature, and maybe control the fan. Then along came the programmable thermostat, and a big push for installation, citing their energy-saving capabilities and the convenience they offer. Over time, many households have replaced basic manual thermostats with programmable models, offering families more control over their comfort and energy use.
Over the last few years, you’ve probably heard a new term in the world of thermostats: the smart thermostat. While smart thermostats are the latest trend in home comfort and energy control, many homeowners do not know a lot about them; unless you’re a technology junkie. So what’s the big deal about smart thermostats? Read on and you’ll see. Why Would I Want A Smart Thermostat? A programmable thermostat allows you to program temperature settings around your household needs, helping you save energy by offering automatic control — smart thermostats offer capabilities above and beyond the programmable stat, keeping homeowners connected and aware of their comfort and energy settings. Smart thermostats present homeowners with a variety of useful features, such as WiFi connectivity, maintenance alerts, data on energy use, and even the ability to learn your family’s comfort needs. Smart thermostats keep homeowners connected and informed regarding their HVAC system and energy use, with the goal of creating a more comfortable and energy efficient indoor environment with little homeowner effort involved. Popular models include the Nest and Ecobee4 smart thermostats. Advantages Of Using A Smart Thermostat Include:
Is A Smart Thermostat Worth The Cost? It’s no secret — a smart thermostat is going to cost you more than a programmable model. Some smart thermostats feature easy installation that a homeowner can complete on their own, while others require professional installation, further raising your costs. With the hefty price tag on a smart stat, many homeowners question if it’s really worth the cost. Our answer is yes. The energy savings achieved by smart thermostat usage will allow the equipment to pay for itself over time. If you currently have a manual thermostat, upgrading to a smart stat is certainly going to be worth it, because of the energy savings it will help you gain by taking system adjustments out of your hands (user errors and forgetfulness account for a great deal of energy waste). If you already have a programmable thermostat and are using it properly, a smart stat can still help you save. The data it provides and advanced features will help you fine-tune your energy use. Since you’re already using a programmable stat, the payback period may be longer. How Much Could I Potentially Save? While actual savings will vary from home to home based on factors such as temperature preferences and energy costs, installing a smart thermostat offers the potential for significant savings. According to ENERGY STAR, correct use of a programmable thermostat will save you approximately $180 per year. The big IF with a programmable thermostat is whether or not you’re using it correctly — since a smart thermostat eliminates the element of user error with a programmable thermostat, it’s safe to say you’ll have comparable savings. Here is what you can expect to save using an Ecobee4 smart thermostat: Annual Savings Using An Ecobee4. Many smart thermostat manufacturers offer online savings calculators which can help you determine your potential savings based on the area in which you live. Find A Pro. Installation professionals can remove and recycle your old thermostat, install a new Smart Thermostat, connect it to your Wi-Fi network and give you a quick demo. Get professional installation >  Painting the entire interior of a house can transform it from mundane to awe inspiring! It will also raise property values and help you sell your home faster. Doing it right requires serious planning, but can be worth the effort for many reasons.
Painting the Interior of your home is by far the most popular do-it-yourself home improvement activity, and it's easy to see why. There's no better, more affordable way to freshen up rooms than with a new coat of paint. Plus, painting isn't terribly difficult and doesn't require specialized training. Any able-bodied homeowner can paint rooms—all you need is a little patience, practice, and some helpful advice. These painting tips can help even novice DIYers achieve professional-quality results. Follow these suggestions and you'll not only paint better, you'll work faster and neater, too. 1 Prep the Surface A successful paint job starts with properly preparing the surface you're going to paint. That means you must scrape, sand, patch, and fill every hole, crack, dent, and surface imperfection. This isn't the fun part of painting a room, but it is the most important part. No paint, regardless of its cost, color, thickness, or manufacturer's claims, will hide a pockmarked or cracked surface. 2 Tint the Primer Priming walls and ceilings is mandatory whenever you're painting new drywall or painting over a dark color. But it's smart to prime any time you paint. Primer serves three main functions. First, it blocks stains from bleeding through. Second, it allows one-coat coverage for the paint. Third, and most important, it improves paint adhesion, which greatly reduces blisters and peeling. Professional painters will often tint the primer toward the finished color by mixing a small amount of topcoat paint into the primer. This trick greatly enhances the ability of the topcoat to completely hide the primed surface. You can now buy paints that contain primers, but nothing covers as well or improves adhesion as much as a dedicated primer. 3 Go for Canvas Rather Than Plastic Plastic drop cloths provide an inexpensive way to protect floors and furnishings from paint spatters, but you'd be much better off investing in canvas ones. Canvas is extremely durable and rip-resistant. It lays flat and presents much less of a tripping hazard. Canvas absorbs paint drips, unlike plastic drop cloths, which become slippery when spattered with paint. Canvas drop cloths can be easily folded around corners and doorways, something that's impossible to do with plastic sheeting. Plus, most plastic drop cloths must be tossed out after using. Canvas drop cloths will last a lifetime. 4 Reach for an Extension Pole Forget the stepladder and get yourself a telescoping extension pole for your paint roller. Extension poles come in various lengths, up to 18 feet long, but one that extends from 18 to 36 inches is good enough to paint rooms with 8- to 9-foot-tall ceilings. Check that your paint roller's handle has a threaded hole in the end, then simply twist it onto the extension pole. When shopping for extension poles, look for one that has a soft, nonslip grip and a rigid metal core. And be sure the threaded end of the pole is also metal. All-plastic handles are too flexible, which makes them hard to control. 5 Use a Paint Grid, Not a Tray Rolling paint from a paint tray is a futile, messy proposition. Here's a faster, neater, better approach: Roll paint directly from a 5-gallon bucket using a paint grid. A paint grid is simply a rectangular, rigid metal or plastic screen that hooks onto the rim of the bucket. Fill the bucket about halfway with paint, then hang the grid inside the bucket. Dip the roller sleeve into the paint, and roll it against the grid to remove excess paint. It's that easy. At the end of the day, drop the grid into the bucket and snap on the lid. 6 Overnight Storage If you're done painting for the day but still have more to do tomorrow, you don't have to go through the laborious process of cleaning your paintbrushes and paint-roller sleeves. Instead, simply brush or roll off the excess paint, then tightly wrap them in plastic food wrap. If necessary, double up the plastic to seal out any air, then place the wrapped brushes and roller sleeves in the refrigerator to keep them fresh. This might sound crazy, but it works—it'll keep the paint from drying overnight and rendering your equipment unusable. The next day, simply remove the gear from cold storage 30 minutes prior to painting, and it'll be supple and ready for use. Properly wrapped paintbrushes and roller sleeves can be stored this manner for several days if you're tackling a really ambitious job. If painting is too much work for you and your family, that doesn't mean that you shouldn't get your rooms painted. You may want to consider hiring Professional house painters because they have years of experience and knowhow, and they ask the right questions and offer the best advice as to the latest color trends and which paints offer the best bang for the buck. 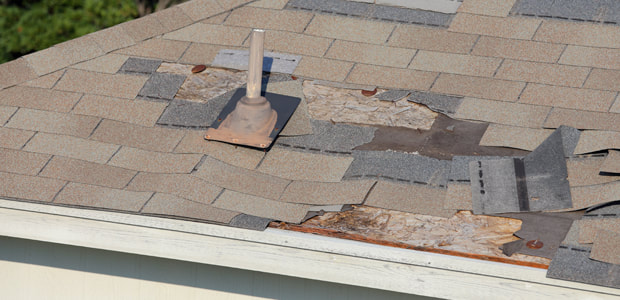 1. A Failing Furnace
Unpleasant sounds and reduced energy efficiency point toward a potentially disastrous furnace problem. In many cases, furnace issues are caused by an old or clogged air filter. Forgetting to change your furnace filter can seriously damage your furnace and threaten the safety of your home. Dirty filters restrict your furnace’s airflow and reduce its energy efficiency. This will result in higher utilities and additional strain on your unit. An overworked furnace can also experience mechanical failures. In extreme cases, furnace defects can cause gas and carbon monoxide leaks. Update your filter if you notice the signs of a furnace problem. Most furnace professionals recommend changing your filter once a month — especially during seasons that require constant HVAC activity. The cost of a replacement will differ according to the filter’s effectiveness. Bargain- priced models come in convenient multipacks but lack sufficient filtering capabilities. Washable filters — while more expensive than disposable models — are reusable for several years and provide excellent protection against dirt, dander and other airborne irritants. 2. Rotten Roofing Ignoring roofing problems can threaten your home’s safety and cost tens of thousands of dollars in future repairs. Thankfully, you can avoid roofing-related disasters with a regular inspection. Begin your inspection by walking around your home and looking for signs of damage. Loose or broken roofing materials, curled shingles, sagging roofing, loose flashing and depressions near pipes are common signs of a problem. Attic leaks are also indicators of a roofing issue. These can appear in the form of ceiling spots, damp insulation and wet or stained interior walls. Call a pro immediately if you notice any of these problems. You can keep your roof in good shape with an annual roofing inspection. A professional will spot potential problems and lesser-known issues before they become a major headache. Be sure to also book an inspection after severe weather like hail or ice storms. 3. Water Damage Warnings Uncontrolled leaks can cause catastrophic damage to your home and spawn serious health problems. Recognizing the symptoms of water damage and routinely checking your home for these signs will help you avoid serious problems in the future. Damp carpeting, loose tiles, peeling linoleum and cupping wood flooring are common signs of wet subflooring. This is usually due to a saturated foundation. Broken water lines, bad ventilation and faulty landscaping can cause subfloor flooding. Call a pro immediately if you notice any of these signs. Clogged gutters are also a common source of foundation-related water damage — including saturation. Sticks, leaves and other debris can fill your gutters and cause water to overflow and gather near the base of your home. Over time, this water will seep into the ground and damage your foundation. You can avoid clogged gutters with a simple seasonal cleaning. Stains and mold growth are also signs of water damage. These problems can occur anywhere in your home, but they are most common in areas that experience regular moisture. Oftentimes, mold and stains are due to leaking pipes or poor ventilation. Attic leaks can also cause stains and mold growth in your home. Call a professional if you notice any of these problems. A pro will safely assess the problem and provide an appropriate solution. You can prevent some mold and stains by regularly inspecting the pipes around your home. Check under your bathroom and kitchen sinks, as well as in your basement. Be sure to call a pro if you notice any leaks. Summary Its important to address the problems identified above right away so that you can avoid costly repairs that go beyond the actual cause. A good example would be a leaky roof that can destroy your ceiling joist which can lead to damaged electrical lines, etc.. Simply inspecting your home periodically by walking around it to make sure everything looks ok and if you don't have the knowledge of expertise to fix it, always go to the pro's that can.  Fall Maintenance Must-Dos Cooler temps on the horizon, so it's time to make sure your home is prepared. Consider these tasks, and start checking them off! Get Your Gutters Ready Make sure your home is ready to deal with the rain and snow that comes as the seasons change. Walk around your home and check for loose gutters, broken pieces and detached downspouts and make the necessary repairs. Ensure your gutters are clear of leaves and other debris and that your downspouts are directing water away from your foundation. Check Exterior Caulking and Weatherstripping Fall is the perfect time to make sure your house is properly caulked and your weatherstripping is in good shape. Inspect around windows, doors and anywhere else two materials meet to make sure the caulk is in good shape. Check weatherstripping around doors and replace if it's broken or missing – it's super easy to do. Give Your Roof a Once-Over No one wants to be fixing a roof in the dead of winter. Give it a once-over to make sure there aren't any signs of trouble. Pay attention to broken or missing shingles, missing flashing and any discoloration. Fix Driveway and Sidewalks Before They Get Worse Changing temperatures and moisture can turn a small concrete problem into a big one. Take some time to repair broken concrete and get some more time out of your sidewalk, driveway and steps before they're in need of full replacement. Winterize Your Gas Grill If you're not a winter griller, now's the time to pack away your grill before it's covered with a foot of snow. In addition to giving your grill a thorough cleaning to remove grease and food scraps, take these steps to help prevent any unpleasant surprises when you fire up your grill again next spring. Shut off the gas at the LP tank, unfasten the burner, slip the gas tubes off the gas lines and lift out the unit. Coat the burners and other metal parts with cooking oil to repel moisture that can build up over the winter and to prevent rust. Then wrap the burner unit in a plastic bag to keep spiders and insects from nesting in the gas tubes during the winter. This is a common problem that can make for balky starts, uneven flames or even a one-alarm fire the next time you light your grill. If you're storing your grill outside during the winter, just keep the propane tank connected (but shut off) and put a protective cover over the entire grill when you're done cleaning it. If you're storing the grill indoors, don't bring the tank inside, even into the garage or a storage shed. A small gas leak can cause a huge explosion if the tank is stored in an enclosed space. Instead, disconnect the tank and store it outside in an upright position away from dryer and furnace vents and children's play areas. Tape a plastic bag over the grill's gas line opening to prevent insects from nesting. Winterize Your Sprinkler System You don't have to pay someone to blow out your sprinkler system. You can do it with your own compressor, but be aware that even the largest home compressor isn't powerful enough to blow out the entire system at once. If you like number crunching and you have the original irrigation layout showing the gallons per minute (gpm) of each sprinkler head, divide the gpm of each zone by 7.5. That'll give you the cubic feet per minute (cfm) you need to blow it out. Otherwise, rent a 10-cfm compressor and hose from a tool rental center. Set the compressor air pressure regulator to a maximum of 80 psi for rigid PVC pipe systems, or 50 psi for flexible black polyethylene pipe. Then turn off the water supply and set the system timer to open just one zone. Next, open the manual drain valve at the end of that zone (if equipped). Then, connect the air line to the blow-out port, as shown. Close off both valves on the backflow preventer. Then remove the plug on the blow-out port and screw in a quick-connect hose adapter. Snap on the air hose and connect the other end to the compressor. Now blow out the line. The heads should pop up and spit out water. Disconnect the hose as soon as they run dry. Don't overdo the blow-out—without water cooling the plastic gears, they can melt in less than a minute. Move on to the next zone and allow the heads to cool. Then go back and blow out each zone a second time. Change Your Furnace Filter Changing your furnace filter is one of the easiest things you can do to keep your furnace in good shape. If you haven't changed it in a while, make sure you have a fresh one before your turn your furnace on for the first time. Annual Tune Up And Maintenance For Your FurnaceMake sure your furnace is in good shape before you really need to use it. With a few tools and some time, you can perform a DIY furnace inspection to head off problems before they start. Check Your Water Heater Extend the life of your water heater tank and maintain your water heater's efficiency and safety with a few minutes of basic maintenance once a year. Learn how to clean sediment from your water heater here. Winterize Your Lawn Mower Don't just shut off your lawnmower and leave it until spring – that's a bad idea. But winterizing your mower only takes an hour. Give the deck a thorough cleaning. Then, add fuel stabilizer and a few ounces of oil to make sure the engine will start right up without hesitation in the spring. Store Outdoor FurnitureDon’t leave your outdoor furniture exposed to the elements all winter long. At the very least, give your furniture a thorough cleaning and cover it or bring it inside for the season. Stockpile Firewood Whether you have a source of wood on your property or need to purchase a cord or two, fall is a great time to spend cutting and chopping wood to burn in your fireplace all winter long. And if you're using a chain saw, make sure to brush up on your safety knowledge before you hit the forest. Cut Your Lawn Short Keep mowing your grass until it stops growing. And your last mow of the season should cut your grass nice and short. This reduces the chance that your lawn will get snow mold and vole damage. Fertilize Your Lawn It's important to apply fertilizer to your lawn during the fall – in fact, if you only apply fertilizer once a year, fall is the time to do it. Your lawn has spent all summer growing and it's hungry. Bring Paint InsideFreezing can ruin latex paint and other finishes, so make sure to move your paint inside before the first frost. Some latex paint can survive a couple freeze/thaw cycles, but it's better not to chance it. Inspect and Fix Your Garage Door Cold can wreak havoc on garage door tracks. Make sure your garage door is in good shape so you don't find yourself stuck in the garage (or worse yet – stuck outside). Learn all you need to know about fixing your garage door here. Check Your Detectors With furnaces turned on, the windows closed and portable heaters humming along, fall is a great time to make sure your smoke and CO detectors are working. Check batteries and expiration dates – smoke detectors are typically good for 10 years, and CO detectors last for about six years. Clean Dryers and Vents Thousands of dryer fires are caused by lint every year, yet they can be easily prevented with a few minutes of cleaning. With drier air and cooler temperatures approaching, make it a fall ritual to clean out your dryer and vent. Closing Summary There are so many more things you can do to get your home ready for the winter.....our best advice is to use some common sense. Ask yourself these two questions; "Can water, or the cold weather ruin it and how much will it cost me? If you answer "Yes" to any of these two questions, make sure that you take care of it before its too late!  |
AuthorsWe're local handy guys and girls who love to build things, rebuild things and create things! ArchivesCategories |
 RSS Feed
